How to Make Chocolate Buns
Baking is one of my favorite pastimes. I enjoy baking cookies, cakes, breads, pies, muffins, cupcakes, and much more.
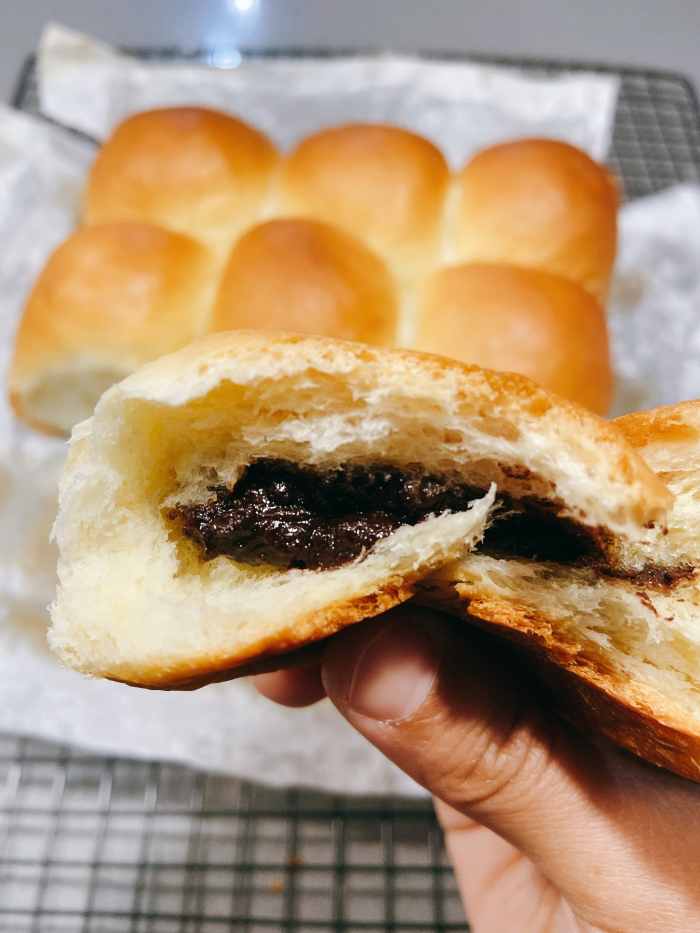
The filling in these buns is so chocolaty!
A Delightful Treat With Coffee or Tea
I love baking in the fall! The weather forecast is predicting rain for Sunday, and I'm planning to bake chocolate buns for my weekend treat. They will be the perfect thing to take along for our weekend drive.
Chocolate Filling From Scratch
The best part of these chocolate buns is the creamy and delicious chocolate filling. I like making the chocolate filling from scratch. However, if you don't wish to take this extra step, you are welcome to buy store-bought baking chocolate, such as chocolate buttons or chocolate wafers. I used dark chocolate chunks as I like the bitter flavor, though I also added icing sugar to add a bit of sweetness.
Make It Your Own
The ingredients for the dough is quite similar to the regular buns. For a twist, you can add ground cinnamon. This is also a good make-ahead recipe; just freeze the dough, and then when you're ready to bake, take it out of the freezer, thaw, and let it rise before baking.
These chocolate buns are so delicious that it is difficult to resist the temptation to eat one as soon as they come out of the oven. Try to wait until they cool down a bit, first! The texture of the buns is amazingly perfect. They are soft and light, exactly as they should be.
Cook Time
Prep Time: 1 to 2 1/2 hours (including resting and proofing time)
Total Time: 3 to 4 hours
Makes: 18 buns
Ingredients
For the yeast mixture:
- 275 ml warm whole milk
- 1 (7-gram) package active dry yeast
- 10 grams sugar
For the dough:
- 500 grams bread flour
- 40 grams sugar
- 70 grams unsalted butter, room temperature
- 1 whole egg and 1 egg yolk, room temperature
- 1 teaspoon salt
For the chocolate filling:
- 100 grams chocolate chunks, I used 62% dark chocolate
- 1/4 cup half and half or any type of milk you preferred
- 5 tablespoons icing sugar or add more to your preference
- 3 tablespoons butter
- 2 tablespoons Nutella, add later (optional)
Note: You can make the chocolate filling ahead of time (let it sit overnight in the fridge) and take it out the next day (day of baking).
Instructions
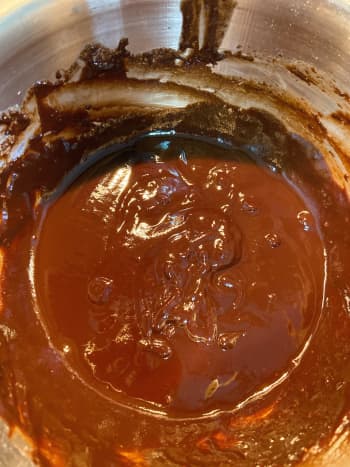
- Make the chocolate filling: Add some water to a medium saucepan or pot and bring to a very gentle simmer. Place a heat-safe bowl on top, but make sure the bottom is not touching the water.
- Add the chocolate chunks or buttons, half and half, and butter to the bowl and stir with a whisk. Continue to whisk until smooth and melted.
- Add the icing sugar and whisk until it is smooth and well-combined with the chocolate mixture.
- Remove the bowl from heat. Let it cool. (I added 2 tablespoons Nutella and mixed with the chocolate mixture.) Then, cover the bowl with cling wrap and let it sit in the freezer for 30-45 minutes.
- In a mixing bowl, combine the warm milk, yeast, and sugar. Let the mixture dissolve and set aside for 5 minutes.
- Combine the flour, sugar, and salt in the yeast mixture. Using a lower speed, start mixing the ingredients. Add butter and eggs into the flour mixture. Increase the speed and mix until the dough comes together. Transfer the mixture onto a baking mat to shape the dough into a ball.
- Transfer the dough into a greased bowl. Let it sit for 1 hour or until it doubles in size.
- Take out the chocolate mixture from the freezer and divide them into equal-sized balls (see photo below.) Transfer the chocolate balls to the tray and let them sit in the fridge before assembling.
- When the dough is ready to divide and shape, take out the chocolate filling from the fridge.
- Deflate the dough and divide it into 9-18 equal-sized portions. Using a rolling pin or your palms, flatten each portion to a 1/4-inch thickness. Take the chocolate filling and put it in the center of the dough.
- Fold the edges over the center and pull it over to cover the filling. Shape the dough into a smooth ball, tucking the ends underneath to close. Repeat with the remaining dough.
- Arrange the dough balls on a baking pan that is lined with parchment paper. Cover it with a clean kitchen towel and let it rise again for about 1 hour, or until doubled in size.
- Preheat the oven to 350°F and bake for 28 to 30 minutes.
- Brush the top with melted butter and let the buns cool on a wire rack.
- Enjoy the chocolate buns with coffee or tea.
Photo Guide


© 2020 Liza
Comments
Liza (author) from USA on October 13, 2020:
Hi Lakshmi, thank you for your wonderful comment on these chocolate buns. They are delicious! Don't forget to try making them for your family!
Liza (author) from USA on October 13, 2020:
That's right, Peggy. Now, I can make them at home and have them any time I want. Perfect for snacking, and I like eating it with coffee.
Lakshmi from Chennai on October 13, 2020:
Your recipes are like a chef made one and i love your recipes and your way of presentation.
Peggy Woods from Houston, Texas on October 12, 2020:
What a surprising treat to be able to bite into these yeast buns to find the chocolate center. Thanks for sharing your recipe!
Liza (author) from USA on October 12, 2020:
Hi Ankita, you're welcome. I think every chocolate and bread lover should try making them :) Thank you for your comment.
Ankita B on October 12, 2020:
The chocolate- filled buns look so tempting. Thank you for sharing this amazing recipe, Liza.
Liza (author) from USA on October 11, 2020:
Absolutely. I had them with iced and hot coffee as well. Delicious! Thanks for commenting, Flourish.
FlourishAnyway from USA on October 11, 2020:
Oh my goodness does this look and sound too yummy! I’d have to enjoy mine while still kinda warm with a good cold drink.
Liza (author) from USA on October 11, 2020:
Correct, Liz. Today the weather is so lovely. I'm glad I have baked these buns as we all started embracing the cool temperature. Thank you for your wonderful comment.
Liza (author) from USA on October 11, 2020:
Hi Amy, yes, the recipe is simple and easy to follow. Actually, the filling can be substituted with different filling such as jam. Thank you for your comment. I appreciate your visit.
Liza (author) from USA on October 11, 2020:
You're welcome, Linda. We have eaten half of the nine buns, and they were delicious. By the way, I am a chocolate lover. These chocolate-y filled buns are perfect for the weekend snack. Thank you for commenting.
Liz Westwood from UK on October 11, 2020:
These look great and professional as ever. Just the tonic as winter approaches and the threat of another lockdown in our area.
Amy on October 11, 2020:
This recipe sounds absolutely delicious and simple to make. Thanks for sharing, Liza!
Linda Crampton from British Columbia, Canada on October 11, 2020:
I love the thought of buns filled with chocolate! They would be a wonderful treat. Thanks for sharing the recipe, Liza.